
How to set up your Dubsado scheduler
The Dubsado Scheduler is a powerful tool in your arsenal to provide a great client experience. With it, you can say goodbye to endless email chains to find the right time and date and hello to a smoother booking process for your clients.
So let me walk you through setting up the scheduler in Dubsado appointment scheduler.

So where to find the Dubsado Scheduler?
The Dubsado scheduler can be found in the menu on the left side of your screen under Templates ➝ Scheduler.

What do you need before setting up your Dubsado Scheduler
Before diving into setting up your scheduler, there are a few things you'll need to have in place.
Dubsado provides canned emails specifically for your scheduler, but for the best client experience, it's essential to:
Tailor these emails to reflect your brand's voice and fonts consistently. Make sure that the font, font size, and wording align with what you use on your website and in your emails.
Adjust the format. As you can see from the third screenshot below, the email does not look good. For reference, I’ve included a screenshot of how I’ve formatted my confirmation emails.
Double-check the smart fields. Smart fields pull information from certain actions or information in Dubsado into your emails. What this means is that these smart fields will display the date, time, appointment duration and location based on the appointment your client made through the Dubsado Scheduler. You’ll want to check if the emails have all the smart fields you need and if you want to update the name in front of the smart field (you can see these as descriptions).
You can find the canned emails in the canned emails section under Templates ➝ Canned emails ➝ Edit templates. The templates that are related to your Dubsado Scheduler are:
Confirmation Email
Reminder Email
Send Scheduler Email
Send Scheduler Group Email (only needed if you use the Dubsado scheduler group)
Appointment Rescheduled Email
Appointment Cancelled Email
For more insights into canned emails in Dubsado have a look at this blog post ➝ Dubsado Setup Checklist for Designers.
Or if you need some help creating your emails why not use 40+ email scripts for brand and website designers. A template with more than 40 email scripts from kickstarting conversations with new inquiries and sending out proposals to presenting your concepts and wrapping up the project with the final file handover. So that you can spend less time on emails and more time doing what you love – creating amazing designs!


What the Dubsado Appointment confirmed email looks like and how you can adjust the format.

What the Dubsado Appointment confirmed email looks like
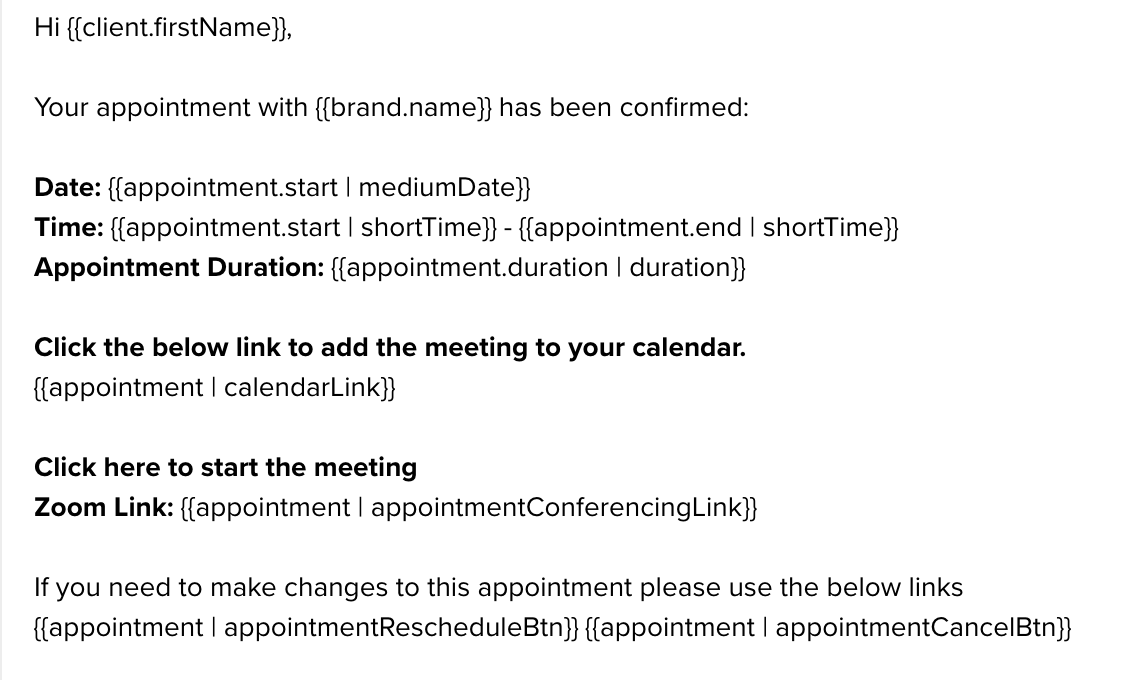
What the Dubsado Appointment confirmed can look like if you adjust the format.
Creating a Dubsado Scheduler template
When you click on the scheduler, Dubsado has already made two scheduler options (one is for paid appointments and one for free appointments). You can leave these as an example or adjust them to your needs. However, in this blog, I want to show you how you can set up the Dubsado Scheduler from start to finish so I will create one from scratch..
To begin creating the scheduler, go to the scheduler and press the add template button. Once you click on the add template button, you will see the following screen.

BASIC SETTINGS
You will start with filling in the basics of the meeting:
Appointment Name: This can be the name of your service or free consultation call. Be mindful of the name because your clients will be able to see this.
Appointment Duration: Either select a time frame from the dropdown (15, 30 or 60 minutes) or use the custom option to set your own duration.
When can this appointment be scheduled: You can choose from 3 different options


Rolling day window: This option allows clients to book within a specific number of days from the day they view the scheduler. For instance, if you set the rolling day window to 21 days and a client checks availability on the 1st of the month, they can book an appointment between the 1st and the 22nd of that month. If they revisit the scheduler on the 5th, they can book between the 5th and the 26th. This is a great option for consultation calls.
Fixed date range: Choose this option to offer clients a set date range for booking appointments. Once a date passes, they can no longer schedule appointments via this scheduler. This is great if you only want that scheduler to be available for a certain period for example, for a client to book the brand discovery or strategy call in a specific week within your design timeline.
Indefinitely: With this option, clients can book appointments on any future date where you have availability.
How do I change the availability on Dubsado?
Once you’ve made your choice between the rolling day window, fixed date range or indefinitely you need to change your availability in Dubsado. There are 2 ways you can do this:
Calendar sync: You can sync your scheduler with your Google or Outlook calendar. This is recommended to set this up to avoid double bookings. Any events in your personal calendar that are set to busy will block out corresponding time slots in your Dubsado Scheduler. For instructions on how to set it up, you can check out How to set up the basics in Dubsado
Default time slots: By default, the scheduler displays standard business hours from 9:00 to 17:00. You can change these times to reflect on which days of the week or during which times you want to allow this appointment type. Please note you have to set your default availability for each of your appointment scheduler templates
Ideally, you would use a combination of these options to eliminate as much manual work as possible.
You probably don’t want to be available for calls all day every day. So let’s say you don’t want to have client appointments on Monday's and Friday's because you do admin/marketing on these days. So in the below example, you want to remove availability on Monday the 19th.
To block off time in Dubsado you need to:
Click on Monday the 19th in the calendar. Only when you click a date you will see the update options.
To remove the current default time you need to click the red X to the right of the current times.
Click All Mondays to apply these time slots to all future Mondays. There is another option: Click Only April 19 to only change the default time for this specific date, but in this case, we want to change this for all Mondays.
Do the same for Friday.
If you want to change your default time from Tuesday to Thursday you need to:
Click on Tuesday the 20th in the calendar.
Remove the current default time by clicking the red X to the right of the current times.
Then add the start and end time for your new time slot and click Add Times. You can add more than 1 time slot. You could add 9.00-12.00 and 13.00 to 17.00 if you want to make sure you never have calls between 12.00-13.00
Click All Tuesday to apply these time slots to all future Tuesdays.
Do the same for Wednesday and Thursday.

Once booked, show me as…
There are 2 choices here when it comes to your availability:
Busy: If you select show me as busy you are only available for 1 appointment at a time. This will be your default setting.
Available: If you select available someone else can also book at that exact or at an overlapping time. This is only used when working with a group of people during, for example, a workshop

Location
The location is the place where you will have the appointment. This can be a physical address or a link for a virtual meeting. If you have integrated your conferencing tool like Zoom with Dubsado, you can tick the option to add video conferencing which will show the meeting URL as location.
For instructions on how to set it up, you can check out How to set up the basics in Dubsado
Email
In the email section of the Dubsado Scheduler, you can select the canned email you want to use for inviting a client to schedule a meeting. Be sure to include the scheduler link by putting {{ scheduler | schedulerLink }} in the email otherwise, your client will not see a link to book their appointment.

Now you have set up all the basic information of your scheduler, let's continue to the advanced settings.
Setting up the Advanced Settings of the Dubsado Scheduler
In the Advanced section, you can set rules for the scheduler.

Prevention
Here you can set the amount of time your client can book an appointment in advance. So when you set this at 8 hours in advance, it means that you will have at least an 8-hour warning before the meeting will start.
It will depend on your business what time limit works well for you. Just make sure you have enough time to prepare or organise your day around the meeting instead of being surprised by a last-minute call.

Buffer Time
For the buffer time, you can decide to have your calendar cleared for a specific time before and after the meeting. This ideal to have time for last-minute preparation, travel time for the meeting, to be able to grab something to drink between meetings or to build in a buffer zone in case the previous meeting goes past the scheduled duration.

Increments
When you set increments it will influence the available time slots that are shown to your client. So if you set this as 30 minutes it will show availability in intervals of 30 minutes, if set as 60 minutes it will show availability once every hour etc.
See below example for 30 & 45 minute increment.


Appointment details
Under the appointment details, you can set the maximum number of appointments per day for this scheduler. So if you set this for a maximum of 3 per day, then once the 3rd appointment is booked for a day, other clients no longer can book that appointment type on that particular day.
There is also an option to say that the scheduler can only be used a specific number of times. For example, when you do a promotion, and you only offer 5 calls for a reduced price you can set it to 5. When the 5th call is booked no one can use this scheduler anymore.

SENDING & SHARING OPTIONS
Welcome Message
Under the section Sending & sharing options, you can set a welcome message. This welcome message is displayed above the Dubsado scheduler page.


Confirmation Email
Here you can select the canned email template you want to send as a confirmation of the appointment. When you click the dropdown you can select any emails from the canned emails.
Additional form
Sometimes you might need your client to fill in a questionnaire when they make an appointment. For example, when you need to have more information about their business before the meeting. To add the form, you need to click on add new form and select the form you want to use.
An added benefit is that the appointment will not be confirmed until your client completes to form.
Redirect URL
If you don’t want your clients to see the Dubsado appointment confirmation page you can also send them to an alternative page. Just add the URL under the redirect URL in this section to redirect them to your custom page.
ADDITIONAL OPTIONS
Invoice
If you offer one-off calls and your clients need to pay for the appointment you can add an invoice by clicking on the slider. You click on New Line Item and add the details the same way like you would do with any other invoice. This will require the client to pay the invoice in full before the appointment is confirmed.
Be sure to check if the Allow clients to apply discounts is set to No if they should not be able to.

Notification
To send a reminder of an appointment, you need to make sure you turn the slider on underneath notifications. As you can see in the below example, you can add several reminders. Just add an additional reminder by clicking add and enter the number of hours or minutes before the call you would like to send the reminder(s).

Monthly View
You can customise the look of the calendar. You can show availability in a monthly overview (left) or in a row (right).


SCHEDULER GROUPS
Dubsado gives you the option to group schedulers together. This creates a landing page for your clients, where they can choose the appointment type they would like to make and once selected, will be taken to the correct scheduler to set up the appointment.

To group the schedulers, you first need to have created multiple schedulers. Then click Add Group (at the top right-hand side) and fill in the group name --> select which schedulers you want to add to the group --> select the canned email you want to use when you send a scheduler group link --> click on create

AND THERE YOU HAVE IT
There you have it, a step-by-step overview of how you can set up your scheduler in Dubsado. Want to learn more about Dubsado and client workflows? Check out these blogs:
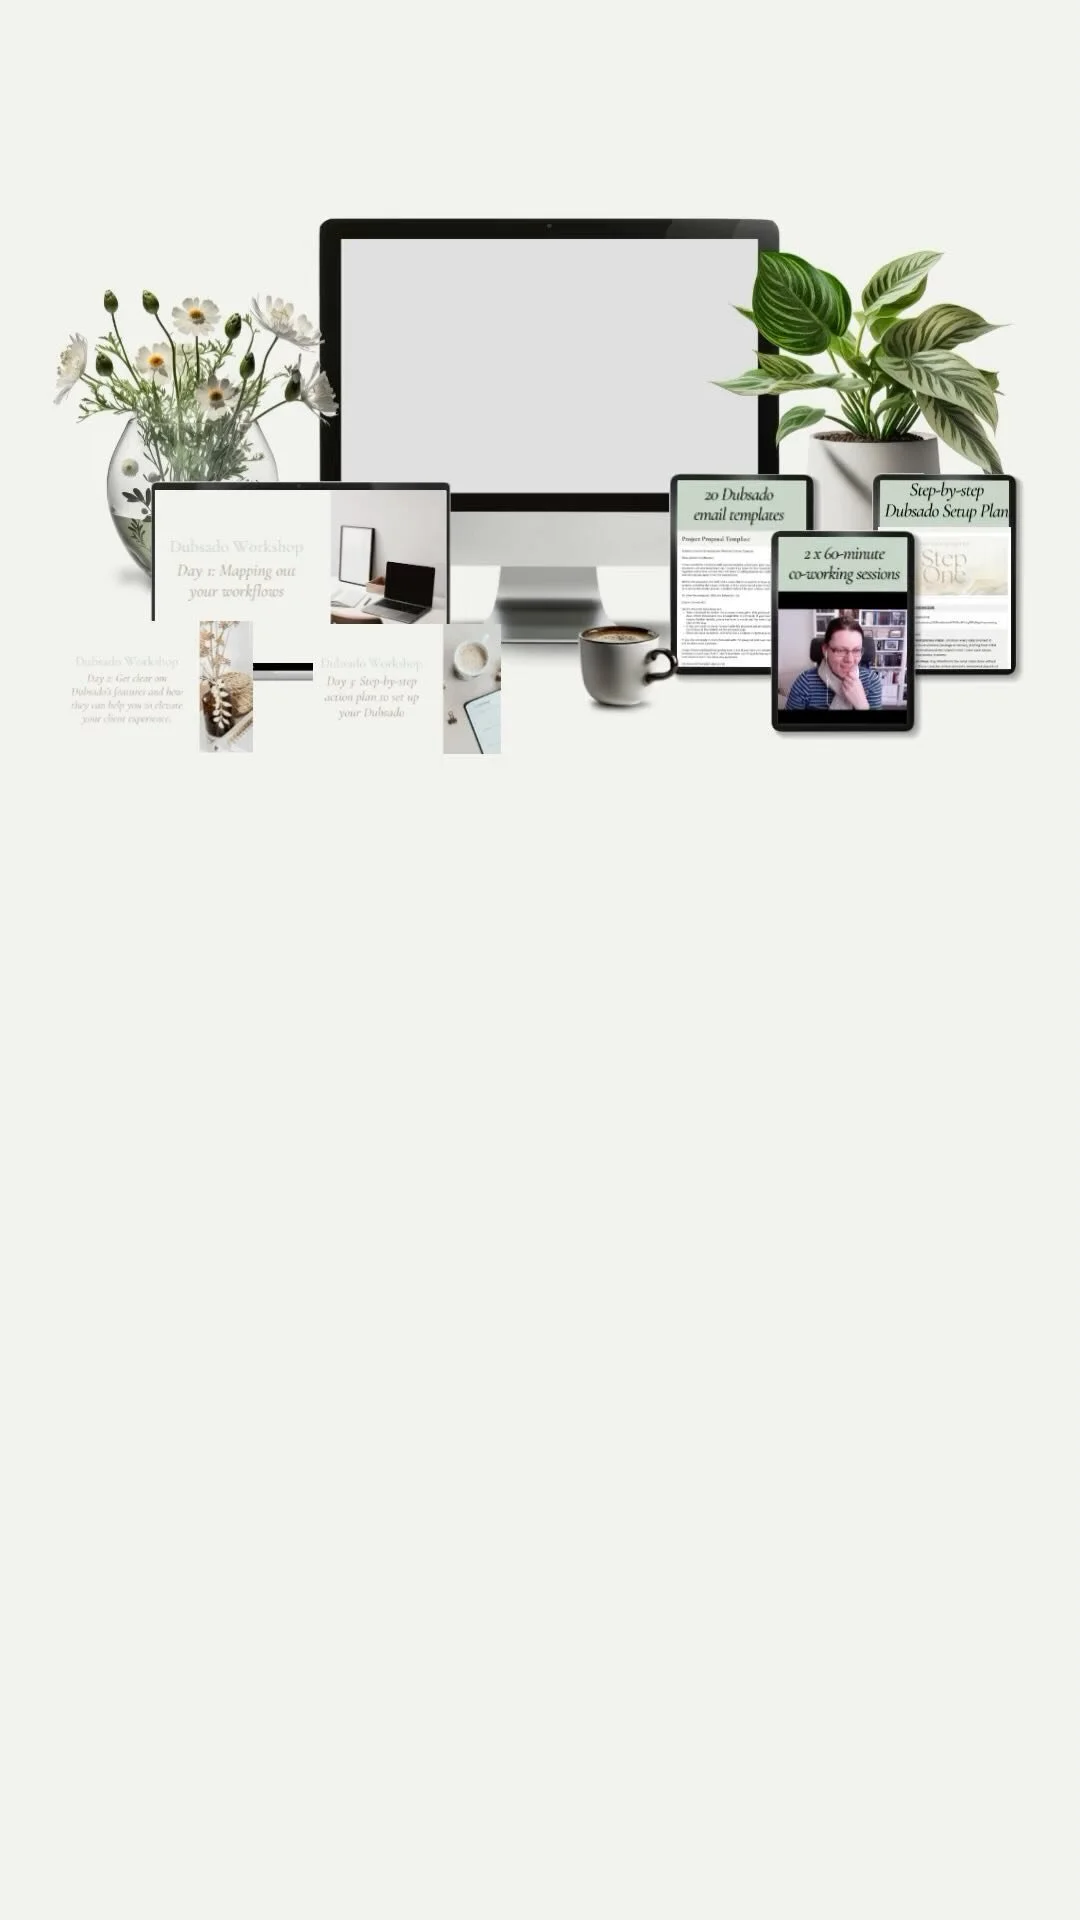
Or take the shortcut with the Step-by-Step Dubsado Setup Guide or the Elevate your client workflow with Dubsado Training which includes 4.5 hours of video recordings from the live workshops held in February 2024, 20 email templates designed specifically for use in Dubsado and the Step-by-Step Dubsado Setup Guide


If you thought this post you might also like:


LOOKING FOR ANYTHING?
Popular items in the shop

FOLLOW ON INSTAGRAM


FAVOURITE RESOURCES